Colour modes and relief lighting
Reference for section 04 · Color mode of the sidebar: the six colour modes, their controls and ranges, and the relief-lighting overlay that works on top of them. For a task-shaped walk-through see Match a brand palette and Get a specific look.
Contents
- RGB · per channel
- Gradient · preset
- HSV · hue from noise
- Posterize · steps + gradient
- Cosine · a + b·cos(2π(c·t+d))
- Flow · gradient direction
- Relief lighting
Shortcut: a
Custom hex palette →button sits right under the dropdown. Click it from any mode to jump straight to the custom-gradient editor (it switches to Gradient + Custom and opens the editor).
RGB · per channel
r scale | g scale | b scale     (each a 0–2 slider)
r invert | g invert | b invert  (each a checkbox)
☐ Per-channel noise — each channel its own sample
Three independent channels. Each channel's scale multiplies the noise
value (0 = channel off, 1 = full, 2 = overexposed); invert flips it
(1 − n).
Per-channel noise (the bottom toggle): when on, the renderer samples
three independent noise fields per pixel and feeds one to each of
R / G / B. Channels drift apart — film-grain, nebula and stellar-cloud
looks become reachable that single-sample RGB can't do (this is what the
nebula preset uses). Cost: 3× the fbm work in RGB mode.
Examples
- pure green: r=0, g=1, b=0, invert g
- magenta: r=1, g=0, b=1, no inverts
- nebula vibes: r=1.4, g=0.55, b=1.5, invert g, per-channel on
Gradient · preset
Pick one of eight palettes (or Custom …):
| Name | Character |
|---|---|
| Viridis | scientific, purple → teal → yellow |
| Magma | black → magenta → yellow |
| Fire | black → red → orange → white |
| Ocean | deep blue → cyan → white |
| Forest | dark green → light green → beige |
| Grayscale | black → white |
| Sunset | dark purple → orange → cream |
| Ice | deep blue → ice blue → white |
| Custom … | user-defined stops — see below |
The bar under the dropdown previews the gradient with tick labels.
Custom gradient & hex palettes
Pick Custom … (or click the Custom hex palette → button) and an
inline editor appears. It is built for matching an exact design / brand
palette:
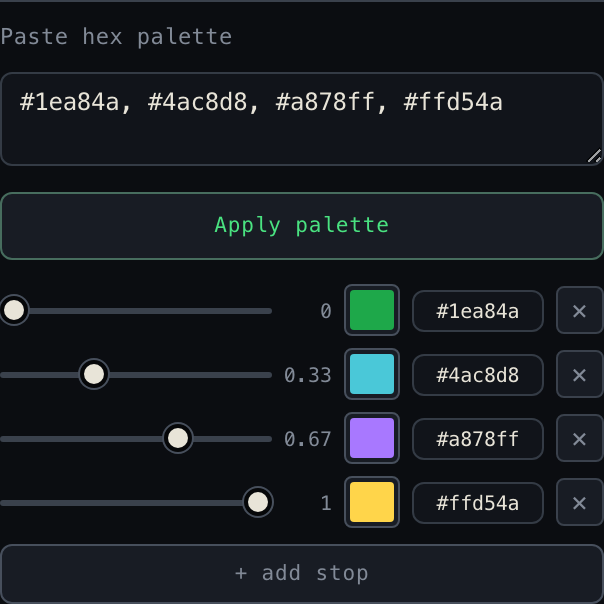
- Paste palette — drop a list of hex codes into the box (any
separator — comma, space, newline; with or without
#; 3- or 6-digit), e.g.#1ea84a, #4ac8d8, #a878ff, and hit Apply palette. The colours become stops spread evenly across the bar (3 colours → 0, 0.5, 1; 4 → 0, 0.33, 0.67, 1; capped at 16). - Per-stop hex field — type or paste an exact
#rrggbbnext to each swatch; it stays in sync with the colour picker both ways. Invalid text reverts on blur, so it can't corrupt the gradient. - Position slider (0–1) with a live value readout — where the stop sits. Stops re-sort on release, so you can drag one past its neighbours.
- Colour swatch — the native colour picker, if you'd rather pick visually.
- × remove — delete the stop (disabled at the two-stop minimum).
- + add stop — appends a stop in the largest gap, colour interpolated between its neighbours.
The custom gradient is in-memory state: it survives switching between
named presets and back, and is saved/loaded automatically with a JSON
preset (no hand-editing) via the gradient field — see
the preset format. Custom palettes are a Gradient and
Posterize feature (HSV and Flow don't use a palette).
HSV · hue from noise
hue shift   (0–1)  — hue offset
hue range   (0–1)  — hue bandwidth across the image
saturation  (0–1)  — saturation (constant)
value       (0–1)  — value/brightness (constant)
The noise value drives the hue only; saturation and value are constant → evenly-saturated, "neon" looks.
Examples
- Aurora: shift=0.30, range=0.48, sat=0.88, val=1.0
- Plasma: shift=0, range=1, sat=1, val=1 (full rainbow)
- Sepia: shift=0.08, range=0.1, sat=0.6, val=0.9
Posterize · steps + gradient
The noise is quantised to N equal steps, then mapped onto the gradient — cartoon-like banding, great for terrain height-maps and stylised effects.
Cosine · a + b·cos(2π(c·t+d))
Palette  — seven ready-made ramps (Rainbow, Dusk, Rose, Citrus, Peach, Neon, Coral) or Custom …
a, b, c, d — three numbers each (R, G, B)
A colour ramp from a formula instead of a list of stops: each channel is a + b·cos(2π(c·t + d)), with t the noise value. a is the base brightness, b the swing, c how often the channel cycles over the ramp and d where it starts. Whole numbers for c make the ramp close its cycle (the lowest and highest noise values get the same colour). Editing any number switches the palette to Custom; the strip above the numbers previews the ramp. The seven built-in palettes, top to bottom: rainbow, dusk, rose, citrus, peach, neon, coral.
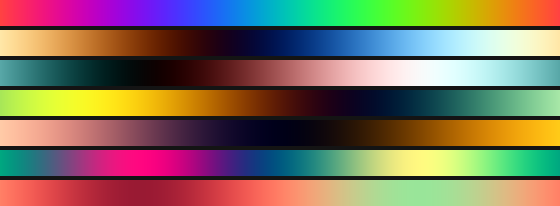
The idea and the seven starting sets are from Inigo Quilez' article Simple color palettes.
Flow · gradient direction
A vector-field visualisation. Instead of mapping the noise value to colour, the renderer takes a 3-point stencil per pixel and computes the local gradient direction:
n0 = noise(x,     y)
n1 = noise(x + ε, y)
n2 = noise(x,     y + ε)
hue        = atan2(n2 − n0, n1 − n0) / 2π + 0.5 + hueShift
brightness = clamp01(floor + magnitude · gain · (1 − floor))
It reads like a wind map or storm front — flat areas read dark, edges and ridges read bright with hues that rotate with the flow direction.
hue shift   (0–1)         — rotate the colour wheel
saturation  (0–1)         — constant saturation
gain        (0.1–20)      — magnitude → brightness multiplier
floor       (0–0.6)       — baseline brightness so flat regions aren't black
stencil ε   (0.1–3)       — pixel offset for the gradient stencil
Cost: 3× the fbm work (three samples per pixel). Compatible with Warp
and Loop. If the field reads too dark, raise gain and floor (the
flow preset uses gain 14, floor 0.24).
Relief lighting
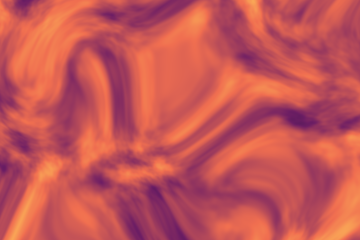
A switch below the colour controls that works with every colour mode except Flow and RGB · per-channel. It reads the noise as a height field and lights it, so a flat colour field turns into silk, stone or lava.
relief          (0–20)    — how steep the surface is
light direction (0–360°)  — where the light comes from, clockwise from the top (315 = top-left)
light height    (1–90°)   — angle above the surface; low = long shadows
ambient         (0–1)     — light that reaches every slope
highlight       (0–1)     — strength of the shiny spot
shininess       (2–128)   — how tight the shiny spot is
stencil ε       (0.1–4)   — pixel offset used to measure the slope
Flat areas keep their colour; slopes facing the light get brighter and slopes facing away darker. Cost: three noise samples per pixel (six with Layer 2), so it is a good reason to switch the Renderer to GPU. It works with Warp, Tile, Layer 2 and Loop. Start with relief 3–6; a low light height with ambient 0 gives dramatic shadows.
 |
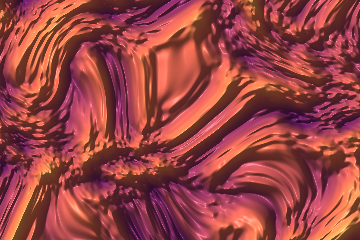 |
| off | relief 4, light from the top-left at 45° |